
Regarding wigs, especially lace front wigs, the main challenge of making them look natural is to make some adjustments. Another popular tip that you should use to get a natural look out of the wig is by plucking the hairline. It gives a natural appearance to front hair by shaving or reducing density of hair at the front side of the wigs, similar to the normal hairline present on an individual’s head. In this blog post, we invite you to learn about the change experienced when you pluck a wig as well as the how-to pluck wig guide and tips on how to master the wig plucking with or without tweezers.
Why Plucking a Wig Matters: Before and After
If you buy a wig, especially a lace front wig, you normally get a hairline which is rather dense. Some people may like this kind of appearance, but it does not look natural because human hairlines are thin. This is where plucking comes in. When it comes to the pubic area, it is recommended that women should not cut it very close to the skin. Trimming a wig reduces some of the hair at the front which makes it possible to have a smooth bridge between the forehead and hair.
Before Plucking
- Dense and Thick Hairline: Another thing that is evident with the wig is that the hairline is normally made in a way that it appears to be unnatural or rather, too neat.
- Unnatural Appearance: There is a way that in a very clear manner, you feel like the hair is not your original hair at the hairline.
- Wiggy Look: The thickness of the hairline can produce a “wiggy” feel about it that is certainly identifiable.
After Plucking
- Natural Hairline: Traditional plucked wig offers a better natural transitional, natural hair line.
- Blended Look: All these make it healthier for use as it will blend better with your skin and face as compared to the wigs.
- Realistic Edges: The hair is less dense in all the right places, in an attempt that imitates the way hair grows on the head, here, in this scalp.
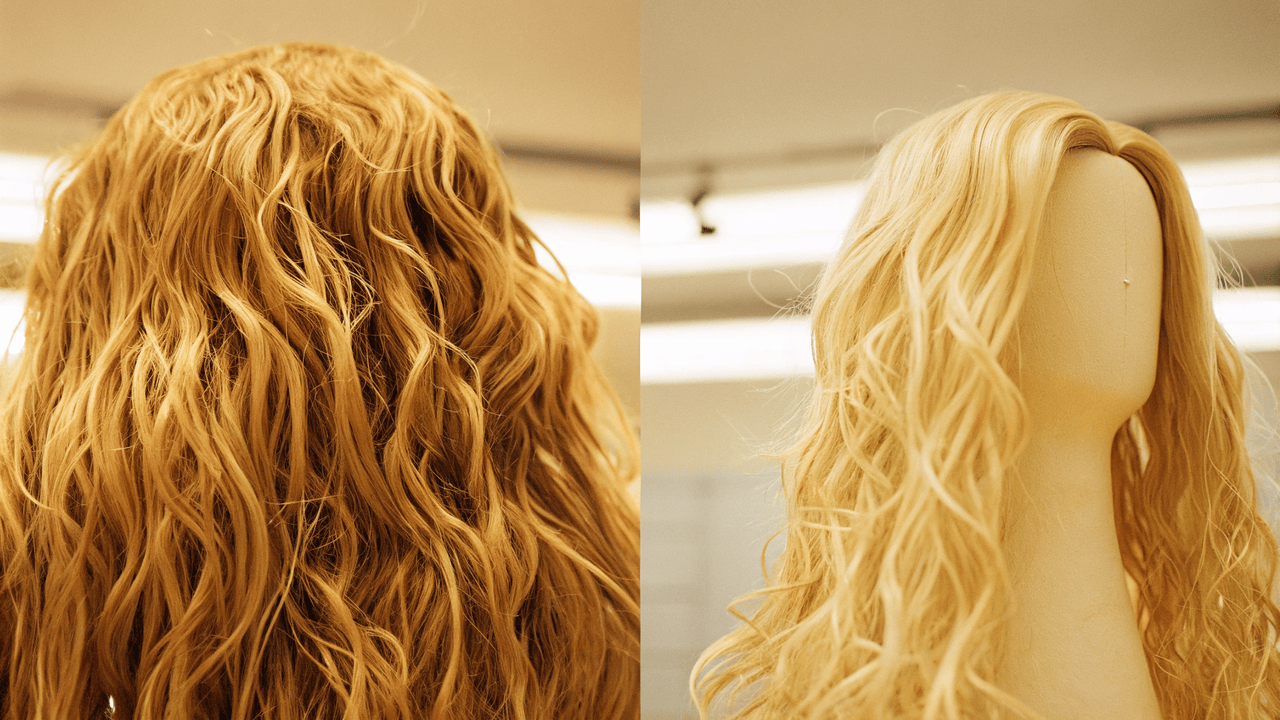
It can be observed that there is a very big difference between a plucked wig before and after in terms of looks. Wig plucking helps the lace front become almost undetectable thus increasing one’s self-esteem and returns you with a natural looking hairline.
How to Pluck a Wig: A Step-by-Step Guide
Starting, on how to pluck a wig one may think it is a very difficult process but the truth is it is not hard at all. Before we discuss how to do it, allow me to give you a simple process on how to pluck wigs and get a natural look at the hairline.
What You’ll Need:
- A lace front wig
- Tweezers (If you don’t have tweezers, we will discuss the substitutes)
- Wigs stand or mannequin head
- Rat-tail comb
- Hair clips
- Spray bottle with water
Step 1: Prepare the Wig
When you are starting to pluck, it is recommendable to put the wig on a wig stand or a mannequin head. This will also assist in stabilizing it and ease the general working on it, it is equally important as the above mentioned. Take another layer of hair and pin it or keep it clipped at the back of the wig. Lightly spray the hair so that it does not get too wet with water using the spray bottle. This makes the hair easily manageable and makes it easier to pluck because the tails can be well identified and targeted individually.
Step 2: Part the Hair
Use the rat-tail comb if it’s a middle part or the parting style you want to make. This means that the hairline becomes more visible and you will be able to see which part needs to be plucked more.
Step 3: Start Plucking the Hairline
With the help of tweezers begin pulling the hair from the hairline in a regular manner. You don’t want to overpluck, so it is helpful to pluck a few hair at a time. Don’t forget to pull hairs from behind the area which is as close to the edge of the hairline as possible to keep the hairline thin.
Step 4: Pluck the Part
After you’ve plucked the hairline, it’s now time to go to the part. No matter if you’ve gone for the middle part or side part or any other type, removing the wig part gives the wig a natural look by eliminating the high density of hair at that place.
To pluck the part, using the tweezers, pluck hair on both sides of the parted line, make sure the line is thin and does not look like it was plucked.
Step 5: Pluck in Sections
You can start and now, you can follow the same pattern you used when doing the part by plucking the hairline in sections, towards the front of the wig. The concept is to reduce the hair density slightly to make the hairline look natural and not overdoing this will enhance the appearance of that line.
Step 6: Examine and Adjust
When you have done this, you should step back and check the hair that got plucked from the wig. If for some reason the hairline looks too thick in some places it is still possible to pluck in areas that need touch up.
How to Pluck a Wig Without Tweezers
But if you do not have access to tweezers, fear not! There is still a way to come out with a natural look and this can be done naturally using the finger tips.
- Follow the same initial steps: put the wig aside, wet the hair and part the hair near the scalp.
- Do not use tweezers for the removal of the hair instead, grab individual strands by your fingers. For real, do not pull too hard or pull too many strands at one instance.
- When plucking, be gentle and do it sparingly in order not to pluck too many hair at a go.
As a result although this is not as effective as using tweezers it is effective at the time and it will likely give you a more natural hairline.
How to Pluck a Lace Front Wig: Key Tips
- Be Patient: Consequently, caring for a lace front wig entails some carefulness especially in matters such as Plucking. It is recommended to do it gradually, and pull in small portions in order not to pull out all hair at once and have different bald areas.
- Don’t Over Pluck: Some of the common mistakes include over plucking. It is not easy to cover if you have taken off too much hair especially at the front of the head.
- Use a Light Hand: When plucking with the help of tweezers, apprehend the hair delicately so that you do not remove too much hair at the same time.
- Pluck in Layers: Splitting the first section into layers and plucking out is a better approach since it builds natural gradation with no attention paid to a specific section.
Tweezing Lace Frontal Wigs: Final Touches
After that, if you are okay with the density, then go ahead and groom the wig according to your preference. You can create baby hair along the hairline, this will just add more beauty to the unit, making it look natural. Moreover, if you have any long hair that extend in front you can trim it in order to give it the shape that you want.
Plucked Wig Before and After: The Results
There is a great difference between a plucked and an unplucked wig. The wig hair that are plucked looks like a natural hairline thus closely attaching the wig hairline to the scalp and forehead. Originally, it might seem like this is not a solution at all but it is one of the most effective methods of wig customization out there.
Conclusion
Just to illustrate how advantageous plucking may be, the before and after pictures of a wig that has been plucked can be used. Using this method of learning how to pluck a lace front wig or a full lace wig is very useful as it gives you a natural, realistic look that will in turn boost your self confidence and give you a better look. Companies producing these wigs do pack the instructions beforehand, so that when you are using either the tweezers or your fingers, just relax, take time and get to know the procedure and you will be able to pluck the wig professionally.
You might also like: How to Care for a Wig